

Jetpack Sidebar Image Widget
How To Use The Jetpack Sidebar Image Widget
In order to start this tutorial, you must first install and activate the Jetpack plugin, which is free. For guidance on how to complete this step, refer to this post.
With Jetpack, you have access to a straightforward widget that allows you to effortlessly insert images into any of the available widget areas within your chosen theme. By accessing the Jetpack settings page through the sidebar in the administrator dashboard, you can enable additional widgets and features. This chapter will focus on the steps to activate the image widget and add an image to the sidebar of your WordPress site.
1. To activate and manage Jetpack features, go to the Jetpack settings page for a user-friendly interface and explanations of each feature.
2. In the administrator dashboard, click on "Jetpack" near the top-left corner. Scroll down and click on "View all Jetpack features" to see all available plugins and widgets.
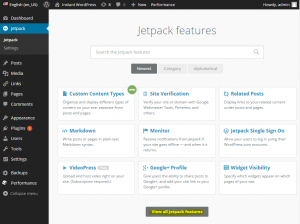
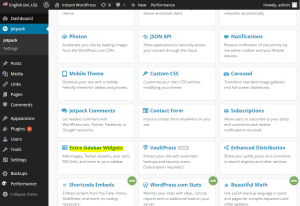
3. Look for the "Extra Sidebar Widgets" tile in the left-side column and click on it to activate.
How to Add an Image to the Sidebar
You can add any image you like to the sidebar using the Jetpack Image widget, provided that it is in the JPG or PNG format. The image doesn’t even need to be hosted on your website either – you can specify any image located on any website, since all you need is the URL.
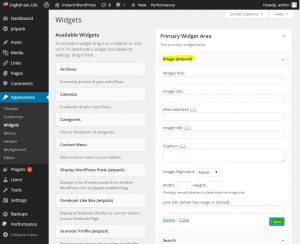
- In your administrator dashboard, mouse over the “Appearance” button and click “Widgets” in the pop-up menu.
- Drag and drop the “Image (Jetpack)” widget from the left-side column to the preferred widget area on your right, such as “Primary Widget Area”.
- Click on the activated widget in the right-side column to display the available configuration options.
- Enter a title for the widget, or leave it blank if you only want to display an image without any accompanying text.
- Enter the full URL of the image in the box beside “Image URL”. Ensure that the URL links directly to an image, including its file extension, such as JPG. You will first need to upload the image to your WordPress media library (Media -> Add New) and then get the URL from there.
- Fill in the alternate text with a few words describing the image. This text will appear when someone moves the cursor over the image.
- Enter a title and a caption for the image if you wish. Finally, choose an alignment, and specify a width and height for the image in pixels if you wish.
- If you want to turn the image into a link, enter the full URL of the link you wish to use in the “Link URL” box.
- Click “Save” to save your changes. The image should appear immediately on your WordPress blog.
That's all you need to do! You can easily add multiple images to your sidebar or other widget areas by simply dragging another instance of the widget where you want it.
Leave a Reply
Your email address will not be published. Required fields are marked *